You may sell your goods/services to customers on credit as a business owner. As a result, there’s a greater chance that clients will owe large amounts of money. You can now create a credit limit for each customer in Erpisto, allowing you to keep track of your outstanding receivables. So, in addition to sending payment reminders for past-due invoices, using this feature will assist you to avoid a large number of unpaid invoices.
You will also view the customer’s credit limit in the Customer Balances Report.
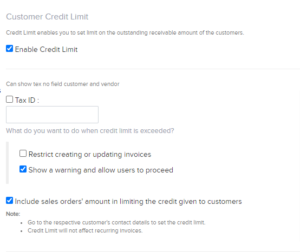
Enabling Customer Credit Limit #
You must first enable the function in your preferences before establishing credit limitations. To do so, follow these steps:
- Go to Settings > Preferences > Customers and Vendors > General.
- To use this feature, check the box Enable Credit Limit.
- Choose what you would like to do when a credit limit increases. You can choose to:
Sales Order Credit Limit #
You have the option of allowing a credit limit for a customer’s sales order. To do so, check the box that says Include sales orders’ amount when restricting customer credit. You will be restricted or warned if the customer’s credit limit has been exceeded.
Based on your Credit Limit Preferences, this limitation or warning message will be displayed for sales orders.
When will the credit limit be considered?
In the event of sales orders, the restriction or warning message will appear in Erpisto as follows:
With regards to sales orders, the restriction or warning message will be shown in Erpisto in the following cases:
- Creation
- Updation
- Other actions (Convert to open, Convert to invoice, Mail, Mark as sent)
- Bulk actions (Convert to open, Convert to invoice, Mark as sent, Mail)
When will it not be considered?
The amounts for different sales orders will not be taken into consideration in the following cases:
- Importing sales orders
- Approving sales orders
- Creating Packages and Shipment Orders
After making the required changes, click Save.
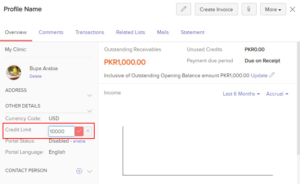
Setting Credit Limits for Customers #
After you’ve enabled the feature, you’ll need to assign a credit limit to each customer. When other people in your business create invoices for a customer whose future ability to pay is unknown, setting a restriction can be advantageous. To set limits:
For existing customers/vendors,
- Select a specific customer/vendor for whom you want to set a restriction under Sales > Customers.
- Go to the overview tab and you will be able to find Credit Limit under the Other Details section.
- Enter the credit limit value by clicking the pencil symbol.
- Save your preferences by clicking the checkmark icon.
- For a new customer/vendor,
- Select the New button at the top of the page under Sales > Customers.
- Fill in all of the required information, and then look for the Credit Limit option under the Other Details tab.
- Enter the value and click Save.
Customer Credit Limit Workflow #
You’ll be able to keep track of the limitations set and new invoices created once you enable the option and set the credit limit. You will be notified while creating transactions based on your selections.
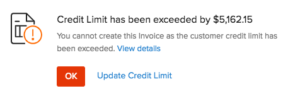
Restrict Creating or Updating Invoices #
If you’ve elected to limit the creation and updating of invoices, you’ll be notified if the invoice total and the sum owing exceed your credit limit.
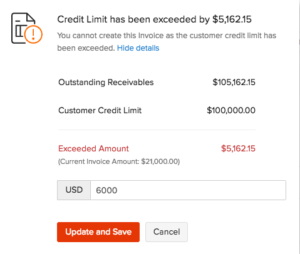
- To see the outstanding amounts and credit limits, click View Details in the pop-up.
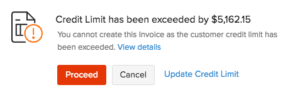
- You can choose to select Ok and cancel the creation of the transaction.
- Click Update Credit Limit to increase the credit limit for your customer.
- Click Update and Save to increase the limit and then proceed with the transaction.
Show a Warning and Allow Users to Proceed #
You will be notified before proceeding with the transaction if the total of your invoice and the balance owed exceeds the credit limit.
- Click View Details in the pop up to view the outstanding balances and credit limits.
- You can choose to select Proceed and save the transaction.
- To increase your customer’s credit limit, click Update Credit Limit.
- To increase the limit, click Update and Save, and then complete the transaction.


