Any company that has recently migrated to erpisto from another accounting software or manually kept books of accounts must guarantee that all information from previous reports is imported. This contains past inventory levels, sales and purchase information, customers and vendors, income and expense figures, numerous journal entries, and much more.
You’ll need to enter all of your opening balances to ensure that all of the data from your old accounting software is available once you’ve migrated to erpisto.
Special Note:
- All of the previous year’s closing balances will be entered as the current year’s opening balances if you move to erpisto after the financial year.
- If you’re migrating to erpisto at any point during the financial year, you can create a Trial Balance to identify all of your accounts’ debit and credit balances.
Essential Points Before Entering Your Balances: #
- Add all of your bank and credit card accounts. Adding them brings up a list of your accounts, where you enter their respective balances.
- Add all of your items, as well as their stock information. You can effortlessly import and track all of your items into erpisto.
- Generate a trial balance on the migration date so that you do not miss out on any transactions or data entered later.
Entering Opening Balances #
Erpisto, by default, has a list of accounts that are common to all businesses. The accounts are grouped into Accounts Payables and Receivables, Assets, Expenses, Liabilities, Bank Accounts, Equity and Income. There are several accounts in each account category.
To enter your opening balances:
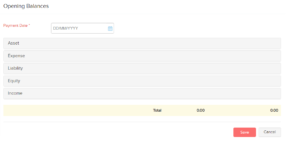
- Click Settings in the top right corner and select Opening Balances.
- Enter the Opening Balance Date. This date is when you’ve started using erpisto (this applies to both new and existing businesses).
- Enter balances of all your Receivables or Payables and Other Accounts to continue.
Entering Accounts Receivable and Accounts Payable Balances: #
Accounts Receivable is the closing balance of the amount you receive from your customers in your previous accounting system. Whereas, Accounts Payable is the closing balance of the amount you owe your vendors in your previous accounting system. You can add the opening balance in one of the following ways:
- Import customers/vendors along with their opening balances
- Enter opening balances of customers/vendors manually
Import your customers/vendors along with their opening balances: #
The easiest way to enter your opening balances is to import your customers/vendors to erpisto. As you import your customers/vendors for the first time, you can also enter their balances, thereby saving your time from doing it again. To do this:
- Go to Sales in the left sidebar and select Customers (for customers) or click Purchases in the left sidebar and select Vendors (for vendors)
- Click the Hamburger icon in the top right corner.
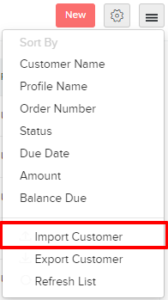
- Click Import Customers/Import Vendors and upload your import file (CSV/TSV/XLS) containing all customer/vendor details and opening balances on the following page.
- Click Next and map the fields in erpisto with the column headers in the import file.
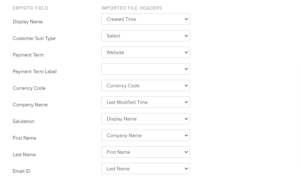
- Click Next once done and import your data.
All your customers/vendors and their outstanding opening balances will be imported to erpisto.
(or)
Enter opening balances of customers/vendors individually #
If you want to enter the opening balances individually, you can do it while you create or edit a customer/vendor.
To enter a new customer/ vendor opening balance: #
- Go to Sales in the left sidebar and select Customers (for customers) or click Purchases in the left sidebar and select Vendors (for vendors).
- Click + New to create a new contact.
- Enter the required details and enter the Opening Balance in the Other Details section.
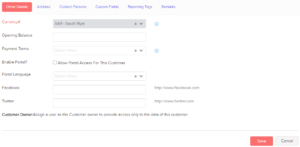
- Click Save.
The outstanding opening balance will be available in the Overview tab of your customer’s/vendor’s details section.
To enter opening balances for an existing customer/vendor: #
- Go to Sales in the left sidebar and select Customers (for customers) or click Purchases in the left sidebar and select Vendors(for vendors).
- Select the particular customer/vendor to add the opening balance.
- Go to the Outstanding Receivables section in your customer details page (or) Outstanding Payables section in your vendor details page.
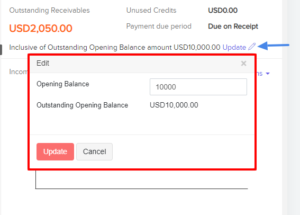
- Enter the balance and click Update.
If you would like to update the opening balance you had entered already, click Update and in the dialog box, enter the updated Opening Balance.
Entering Opening Balances for Other Accounts #
Other accounts include your assets and liabilities, income and expenses, bank balances, and equity. To enter them:
- Go to Settings in the top right corner and select Opening Balances.
- Go to the respective category under Opening Balances.
- Enter the Debit and Credit balances for different accounts.
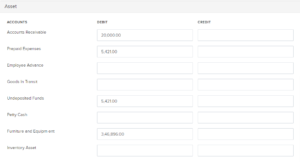
- Enter all the details and click Save.
Creating New Accounts #
If your business deals with accounts other than the default accounts, you can create new accounts. To create a new account:
- Go to Accountant in the left sidebar.
- Click the + Add New Account option on the Chart of Account.
- Select the Account Type from the options available in the dropdown.
- Enter an Account Name and Account Code.

- Mark box near Add to the watch list on my dashboard to display account and balances as a widget in your dashboard.
- Enter a Description if necessary and click Save.


