cIn erpisto, you can customize the appearance of numerous sales and buy transactions to meet your needs better and reflect your brand. Customize one preloaded template or create a new one to accomplish this.
Customization That’s Common to All Modules #
This section covers customization options that apply to templates in all modules. You can also check out the module-specific customization section.
Template Properties #
You can change the overall look and feel, such as the font, background, orientation and size of your templates. This can be done with ease:
- Go to Settings > Templates.
- Click the module for which you’d like to edit a template.
- Hover your mouse pointer over a template preview and click Edit. You can also create a new template by clicking + New and selecting one of the preloaded templates.
- Go to the Template Properties tab.
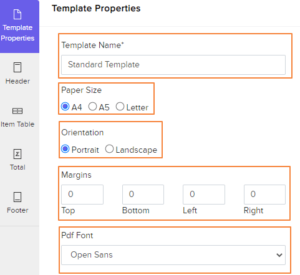
Customizations Available in Template Properties: #
| Fields | Description |
|---|---|
| 1. Template Name | Enter a name for your template. |
| 2. Paper Size | You can select either A4 or Letter sizes based on the medium where this template would be printed. |
| 3. Orientation | This option is for printing purposes as well. Select either Portrait or Landscape based on the medium where this template would be printed. |
| 4. Margins (in inches) | The margins of the template determine how much distance there is between the template’s content and the edges of the medium on which it’s printed. |
| 5. PDF Font | This is the font used to display content on this template. A note will appear under the selected font explaining which languages it’s best suited for. |
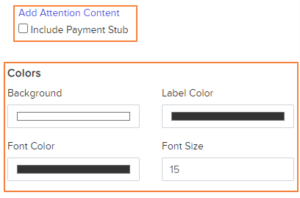
| 6. Add Attention Content | You can add content to draw the recipient’s attention towards an essential message in the template. You can also use placeholders to autofill related information. |
| 7. Colors and Font Size | You can change the colour of the template’s background, font and labels either by entering a Hex Color Code for a specific colour or by clicking the coloured square and using the colour picker. You can also customize the size and colour of the font that’s used in the template. |
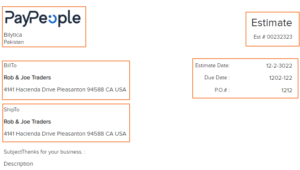
Header #
This section lets you customize the header of the template along with customization options for other information displayed in the document.
- Go to Settings > Templates.
- Click the module for which you’d like to edit a template.
- Hover your mouse pointer over a template preview and click Edit. You can also create a new template by clicking + New and selecting one of the preloaded templates.
- Go to the Header tab.
Customizations Available in the Header Section #
| Fields | Description |
|---|---|
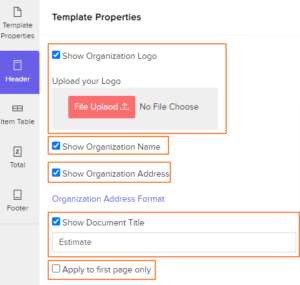
| 1. Show Organization Logo | Enabling this option will display your organization’s logo and allow you to resize it. |
| 2. Show Organization Name | Enable this option to display your organization’s name on the template. |
| 3. Show Organization Address | Choose whether to display your organization’s address on the template. |
| 4. Show Document Title | Enabling this option will display the title of your document, which can be changed according to your needs. |
| 5. Apply to the first page only | Enable this option if the document is likely to have multiple pages and you want to customize the header section for the first page alone. You can also provide separate header content that will be displayed on the other pages. |
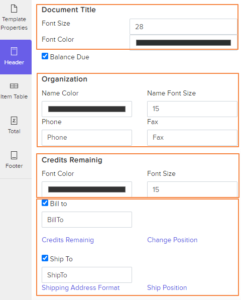
| 10. Document Title | You can change the document title’s font size and colour either by entering a hex colour code or by clicking the coloured square to open the colour picker. |
| 11. Organization | Customize your organization name’s font size and colour either by entering a hex colour code or by clicking the coloured square to open the colour picker. |
| 12. Organization Address Format | This option lets you change your organization’s address format. You can also add or remove placeholders to customize it further. |
| 13. Shipping Address Format | Click this option to change the format in which your customer’s billing and shipping addresses are displayed in the document. You can also add or remove placeholders to customize them further. |
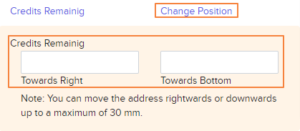
| 14.a. Change Position | Adjust the position of the Billing and Shipping address to the right or to the bottom by a maximum of 30mm. This will be useful while placing the addresses in the transparent part of the envelope.
|
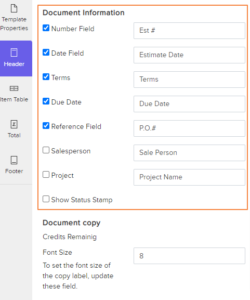
| 15. Document Information | Mark or unmark the listed fields to show or hide them in the template. The label names of these fields can be changed as well by editing the text box next to them. |
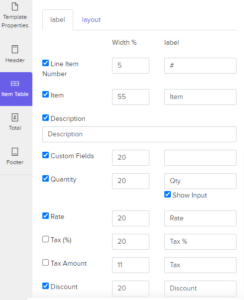
Item Table #
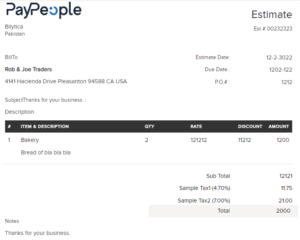
The look and feel of all the elements in the item table–from the size and names of columns to the item rows and their descriptions, can be customized to suit the type of content that would be displayed in the document.
- Go to Settings > Templates.
- Click the module for which you’d like to edit a template.
- Hover your mouse pointer over a template preview and click Edit. You can also create a new template by clicking + New and selecting one of the preloaded templates.
- Go to the Item Table tab.
Customizations Available in the Item Table #
Labels
By checking or unchecking the listed fields, you can pick which rows are displayed in the item table. These fields’ label names can also be altered by modifying the text box next to them.
The width of these columns can be changed by specifying a percentage that is proportional to the table’s overall width. When a column includes a lot of information, changing the column width is extremely handy. The column width can be changed in this scenario to make the column appropriate to the content.
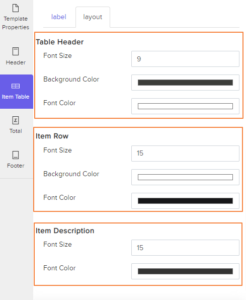
Layout
This section lets you customize the font colour, size and background colour of the Table Header and Item Row, along with the font size and colour of the Item Description.
| Fields | Description |
|---|---|
| 2. Table Header | The background colour, font size and colour of label names in the header section can be customized. |
| 3. Item Row | Customize the font size, background colour and font colour of the item row, which includes item names and other information in the same line. |
| 4. Item Description | Customize the font size and colour of the description below each line item. |
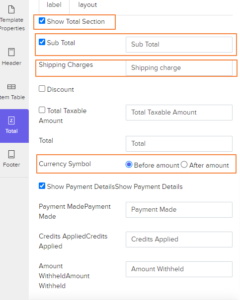
Total #
You can customize the various fields that are displayed in the Total section of your document. To customize:
- Go to Settings > Templates.
- Click the module for which you’d like to edit a template.
- Hover your mouse pointer over a template preview and click Edit. You can also create a new template by clicking + New and selecting one of the preloaded templates.
- Go to the Total tab.
Customizations Available in the Total Section #
Labels
| Fields | Description |
|---|---|
| 1. Show Total Section | Marking this option will enable the entire section and provide further customization options. |
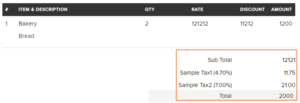
| 2. Sub Total and Total | Marking/Unmarking the Sub Total and Total option will show/hide the total and subtotal in your document. The total and subtotal label names can be edited in the text box. |
| 3. Currency Symbol | Choose whether to display the currency symbol before or after the amount. |
| 4. Quantity | Enable this option if you’d like to display the total number of line items below the item table. The label name of this field can be changed as well. |
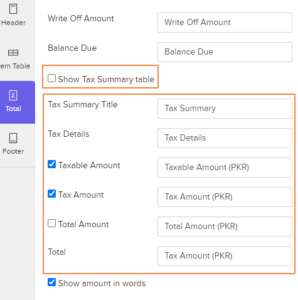
| 5. Show Tax Summary table | Enable this option if you want to display tax details in the entire section of your document. These fields can be shown/hidden, and their label names can be changed. |
Layout
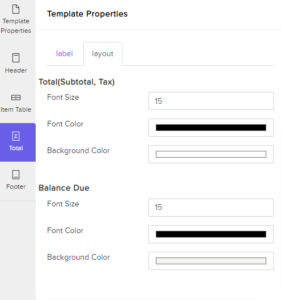
You can modify the background color, font size, and font color of the Total section by selecting the Layout subtab. The font size can be chosen in points, and the font and background colors can be changed with a hex color code or by clicking the colored square to open the color picker.
Footer #
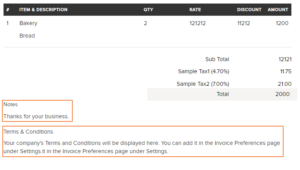
Customize the bottom portion of your document with Notes, Terms & Conditions and any extra information that needs to be conveyed.
- Go to Settings > Templates.
- Click the module for which you’d like to edit a template.
- Hover your mouse pointer over a template preview and click Edit. You can also create a new template by clicking + New and selecting one of the preloaded templates.
- Go to the Footer tab.
Customizations Available in the Footer Section #

| Fields | Description |
|---|---|
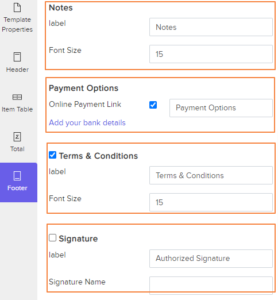
| 1. Notes | Customize the notes field’s label name as well as the font size for the note text.By heading to Settings > Preferences and then picking the module for which you wish to add the note, you may edit the note’s content. |
| 2. Terms & Conditions | Enabling this option will display your terms & conditions and enable you to customize its label name and font size.
Pro Tip: The content for the Terms & Conditions can be changed by going to Settings > Preferences and then clicking on the module you want to add the note. |
| 3. Signature | You can add an image to be used as the signature for your document, along with a customizable label and signature name. |
| 4. Footer | The font size, font colour and background colour of your footer content can be changed either by entering a hex colour code or by clicking the coloured square to open the colour picker. |
| 6. Show Page Number | Enable this option to auto-generate the page number in the footer section if your document has multiple pages. |
| 7. Customize your footer content | You can add information to be displayed in the bottom portion of the document. This content can be customized entirely with placeholders, tables, font options and links to suit your needs. |