Let’s look at the various settings you can configure for the Items module in Erpisto.
Basic Settings #
To configure your item preferences:
- Go to Settings > Preferences.
- Select Items in the left menu.
From this page, you can configure the following preferences for your items:
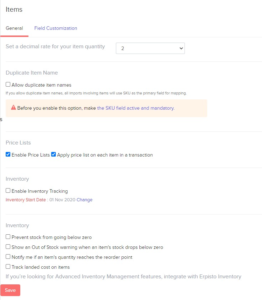
Decimal rate for item quantity #
The decimal rate for item quantity comes into play when creating transactions (like invoices). By default, this rate is two. You can select any decimal rate of your choice.
Duplicate item name #
Enabling Allow duplicate item names to be created or imported in order to generate or import several products with the same name but different parameters such as size and colour. Let’s look at an example to see how this functionality can benefit you.
Once you’ve enabled this option, you’ll need to input the SKU in the SKU field to create an item with a unique SKU. SKU will also be used as the main Field for mapping items when you import them.
Suppose you had previously added items to Erpisto without SKU. In that case, you can export the items, add the SKUs to the file, import the items back into Erpisto and overwrite the existing items.
Out of Stock Warning #
Every time your stock falls below zero or runs in the negative, you will be notified. You can view this by clicking the Bell icon on top of the page.
Reorder Point #
If you have set a reorder point while creating an item, you can enable the notification option to send you a reminder when your stock drops below it. This will help you from running out of stock.
- Click Save if you’ve made changes to any of the item preferences.
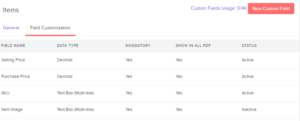
Field Customization #
In Erpisto, the Items module has default fields that can be configured. For example, the Selling Price, Purchase Price, Item Image and SKU. You can configure user-level access for these fields or perform various actions.
To view the default custom fields:
- Go to Settings > Preferences.
- Select Items in the left menu.
- Select the Field Customization tab at the top of the page.
To add extra fields, click the New Custom Field in the top right corner of the page.
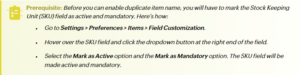
Configure Access #
You can configure different levels of user access for certain default custom fields. Here’s how:
- Hover over the field for which you can configure access and click the Dropdown icon.
- Select Configure Access.
- Set the desired level of user permissions.
- Click Save.
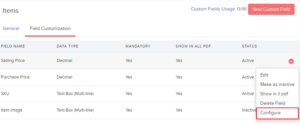
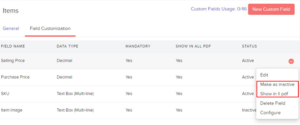
Default Field Actions #
You can perform various actions on the default fields in Items such as:
Mark as Inactive
If you want to disable the field temporarily, you can mark it as inactive.
Mark as Active
You can mark a field you have marked inactive as active
Show field in all PDF
The field is displayed in the transaction PDF
To perform actions on default custom fields:
- Hover over the field for which you can configure access and click the Dropdown icon.
- Select the desired action to be performed.