Table of Contents
Customization That’s Specific To Modules #
Apart from the customization that’s common to all modules, some options are available only for particular modules. This section will cover these specific customization options.
Estimates #
To customize templates for your estimates:
- Go to Settings > Templates.
- Click the Estimates tab.
- Select Edit by hovering your mouse pointer over a template preview. You may also create a new template by picking one of the pre-loaded templates and clicking Add New.
- In the Header section, the Project and Expiry Date fields display the name of the project associated with the estimate and the expiry date of the estimate. These fields can either be shown or hidden, and their label names can be customized as well.
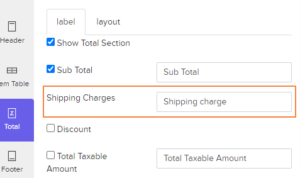
- The Shipping Charges field in the Total section lets you display the shipping charges in your estimate. The label name of this field can be customized.
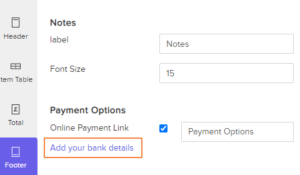
- You can choose to Add your bank details, which your customers can use to transfer an amount, in the Footer section of your estimate.
Invoices #
To customize templates for your Invoices:
- Go to Settings > Templates.
- Click the Invoices tab.
- Hover your mouse pointer over a template preview and click Edit. You can also create a new template by clicking + New and selecting one of the pre-loaded templates.
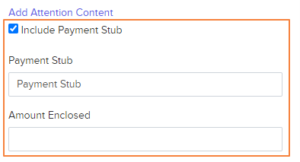
- You can choose to include a payment stub in your invoice in the Template Properties section. In case your customers are going to pay the invoice amount by cash, including a payment stub will add a section for entering the amount enclosed along with other invoice details. This section can be chosen to be included on the first page of the invoice or on a separate page.
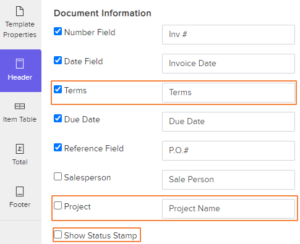
- The following fields can be customized in the Header section of your invoice.
| Fields | Description |
|---|---|
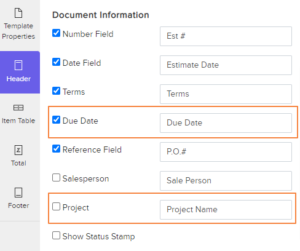
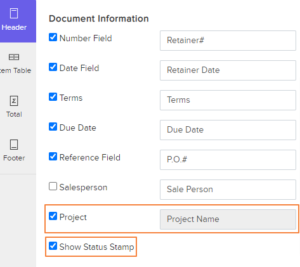
| 1. Terms | Choose whether or not to display the terms for your invoice’s due date. The label name of this field can be customized. |
| 2. Project | Marking this box will display the name of the project that your invoice is associated with. |
| 3. Show Status Stamp | Enabling this option will display the current status, such as “Paid” or “Draft” in the header section of your invoice. |
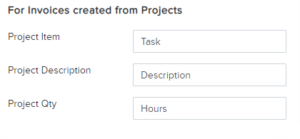
- You can also customize the label names in the Item Table for projects created from invoices.
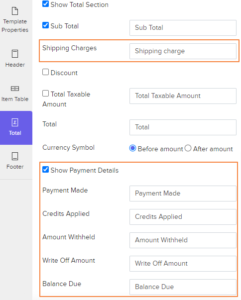
- The following fields can be customized in the Total section of your invoice.
| Fields | Description |
|---|---|
| 1. Shipping Charge | Display the shipping charges in the invoice. |
| 2. Quantity | Enabling the Quantity option will display the total number of project-related items and logged hours in the total section. The label names of these fields can be customized. |
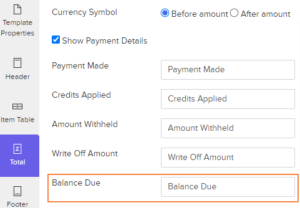
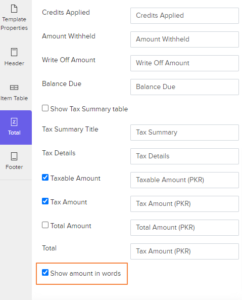
| 3. Show Payment Details | Mark the Show Payment Details option in the Total section to display the following payment-related information in your invoice: Payment Made, Credits Applied, Amount Withheld, Write Off Amount and Balance Due. The label names of all these fields can be customized. |
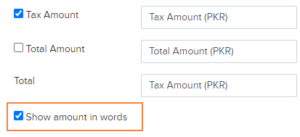
| 4. Show amount in words | Enable this option to display the total amount of the invoice in words.
|
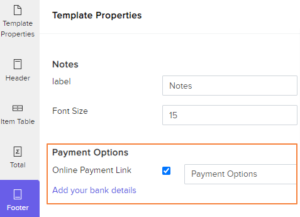
- You can add an Online Payment Link for your configured payment gateways in the footer section of your invoice PDFs. In case your customers want to do a bank transfer, you can Add your bank details in the footer section of the invoice.
Credit Notes #
To customize templates for your credit notes:
- Go to Settings > Templates.
- Click the Credit Notes tab.
- Hover your mouse pointer over a template preview and click Edit. You can also create a new template by clicking + New and selecting one of the pre-loaded templates.
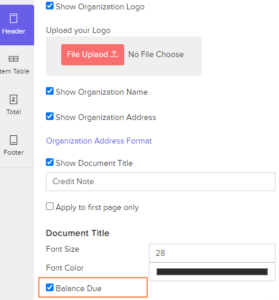
- Enabling the Balance Due option in the Header section of your credit note will display the remaining credits available in the credit note.
- You can choose to display the Credits Used, the Refund amount and the Credits Remaining by enabling the Show Payment Details option in the Total section in the credit note. The label names of these fields can be customized.
Retainer Invoices #
To customize templates for your retainer invoices:
- Go to Settings > Templates.
- Click the Retainer Invoices tab.
- Hover your mouse pointer over a template preview and click Edit. You can also create a new template by clicking + New and selecting one of the pre-loaded templates.
| Fields | Description |
|---|---|
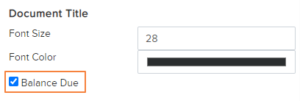
| 1. Balance Due | Choose whether to display that amount that’s due in the header section of your retainer invoices.
|
| 2. Project | Marking this box will display the name of the project that your retainer invoice is associated with. |
| 3. Show Status Stamp | Enabling this option will display the current status, such as “Paid” or “Drawn” in the header section of your invoice. |
- The Show amount in words option in the Total section displays the total amount of the retainer invoice in words.
- You can add an Online Payment Link for your configured payment gateways in the footer section of your retainer invoice PDFs. In case your customers want to do a bank transfer, you can Add your bank details in the Footer section of the retainer invoice.
Bills #
To customize templates for your bills:
- Go to Settings > Templates.
- Click the Bills tab.
- Hover your mouse pointer over a template preview and click Edit. You can also create a new template by clicking + New and selecting one of the pre-loaded templates.
- Enabling the Balance Due option in the Header section of your bill will display the balance that you owe your vendor.